Why a Virtual Camera?
On a Microsoft operating system, your webcam can only provide a stream to one application at a time.* For example, if you wish to use your webcam in Zoom and also in Chrome at the same time, Microsoft will prevent this.
Fortunately, a technology called “Virtual Cameras” has been out for years to get around this limitation. There are many Virtual Camera applications, such as SplitCam, OBS, SnapCamera, ManyCam, etc. We have found that SplitCam is the easiest to use, however, if you have a virtual camera preference, please feel free to use that.
*This only affects Microsoft systems, not Macs.
Setting up your Virtual Camera
If you wish to use SplitCam, here are some step-by-step instructions. You can apply the same logic to other virtual cameras as well.
Ensure your video camera is NOT in use with any applications. If it is, fully stop those applications before installing SplitCam.
Download the https://splitcam.com/download. Choose the 32 bit or 64 bit according to your system. If you aren’t sure, you can check this guide from Microsoft: https://support.microsoft.com/en-us/windows/32-bit-and-64-bit-windows-frequently-asked-questions-c6ca9541-8dce-4d48-0415-94a3faa2e13d
Install SplitCam by following the on-screen instructions. It should be a very simple installation without any configurations needed.
Restart your Chrome browser if it is currently open. This is necessary so it can pick up the SplitCam camera.
If your system only has 1 camera (eg. you use the built-in camera and not an external one) you can skip this next step! If using multiple cameras, you must tell SplitCam which camera to use:
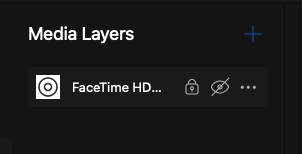
Open the SplitCam app and look at the “Media Layers” under your default Scene. This should be selected on the camera you wish to use.
If it is not, press the 3 horizontal dots next to the incorrect camera and delete that ‘layer’
Press the + button next to Media Layers and select your correct webcam. SplitCam should now be configured. You may need to close and refresh the SplitCam application in order for the change to become stable.
The final step is to change the camera you use in your video chat platforms to use SplitCam instead of your built-in camera. You can follow the guides for Google Meet, Zoom, and Teams.
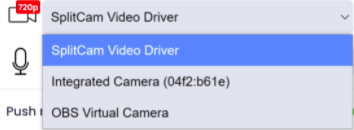
You should be ready to go w/ SplitCam in VirtualSapiens! When you open Virtual Sapiens chrome extension, just go to Your Settings > Video & Audio and ensure SplitCam is chosen as the camera.